Working with Stories
Managing Stories in the Inspector
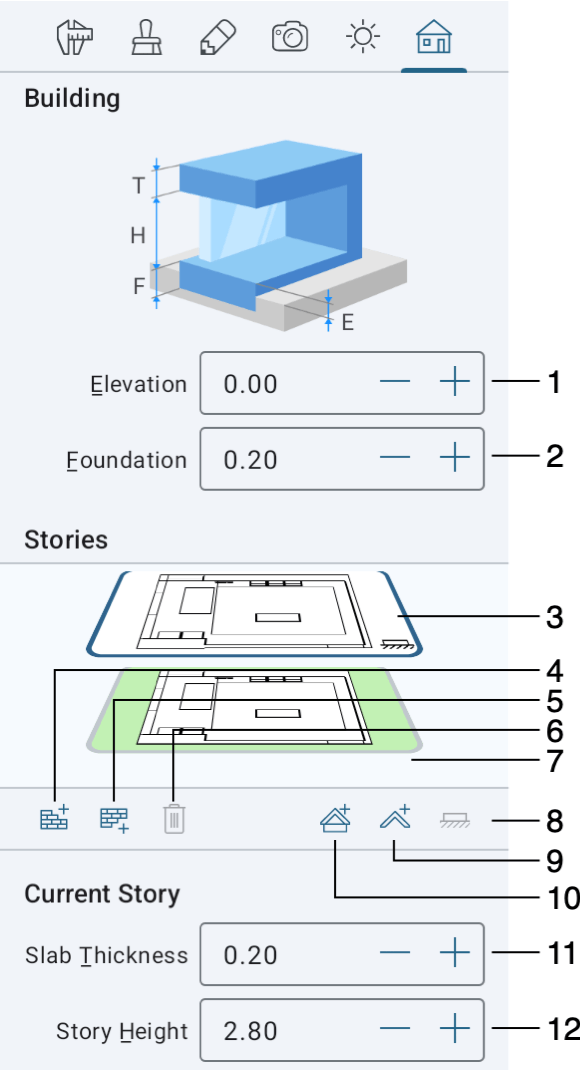
The Building tab of the Inspector lets you change the properties of stories.

1 – The elevation of the ground floor. Changing this parameter affects the whole building.
2 – The thickness of the foundation. If your building doesn't have the basement, the Foundation parameter must be equal to or greater than the Elevation.
3 – The preview of the floors. The active floor has a frame around its preview. Its floor plan is shown in the 2D Plan view. To activate another floor, tap on its preview. The ground floor has an icon in the bottom right corner of the preview. It is the same icon as on the Mark Story as Ground button.
4 – Add a story above the current. This button also adds the external walls which remain selected. If you don't need these walls, tap the Delete button in the toolbar.
5 – Add a story below the current. This button also adds the external walls which remain selected. If you don't need these walls, tap the Delete button in the toolbar.
6 – The Delete Current Story button removes the active story or roof.
7 – The preview of the Site. The Site layer can be used for outdoor objects. When the Site is activated, most of the options in the Building tab of the Inspector are not available.
8 – The Mark Story as Ground button turns the active floor into the ground floor. When you select another ground floor, the elevation of the whole building changes accordingly.
9 – Add an auto roof on the current story. Once a roof has been added, the function of the button turns to removing the roof.
10 – Add an auto roof above the current story. Once a roof has been added, the function of the button turns to removing the roof.
11 – The Slab Thickness parameter changes the thickness of the slab above the active floor.
12 – The Story Height parameter lets you set the height of the active story. This parameter also changes the height of all Story Walls on the current floor. The default height of new stories can be set up in the Project Settings.
Adding Stories
To add a story above or below the current one, tap on the button 4 or 5 correspondingly.
When you add a new story, it becomes active automatically. The contour of the external walls will repeat the external walls of the previously selected story.
Removing Stories
To remove the active story, tap on the Delete Current Story button.
The app removes the active story together with all objects located on it.
If you remove the ground floor, another floor will automatically become the ground floor.
Choosing the Active Story
The active story is the one whose floor plan is shown in the 2D Plan view.
To make another story active, tap on its thumbnail.