Solving Problems
Troubleshooting
- Cannot Open the Program
- Cannot Select an Object
- Red Circles on the Floor Plan
- Performance Issues
- Printing Problems
- Other Problems
Cannot Open the Program
- Some components of the program are damaged or missing.
Solution: Delete the program and reinstall it. The Removing the Program section explains how to uninstall the program.
Removing user's content (objects and materials) is not necessary. - Incorrect program settings were saved in the program preferences file.
Solution: Delete the preferences file according to the Removing the Program section. - The program cannot open a broken document.
Solution: Open the program by double-clicking its icon without opening any document. Then try to open a document.
Cannot Select an Object
The object you cannot select may be locked. Find the object in the Project Tree to verify this.
Performance Issues
The 3D view may respond to your actions with a delay because of the limited computer performance. The performance problems usually don't affect the 2D Plan view.
To speed up rendering in the 3D view, adjust the 3D Settings in the Settings dialog. This involves finding a compromise between the performance and the quality of the 3D picture. To do this:
- On a Mac with the Retina™ display, deselect the Retina™ High Resolution check box.
- Set the Full Scene Anti-Aliasing and Reflection Quality parameters to lower values.
- Set Shadow Casting Lights to Nearest 2 or Nearest 4. In this way, you limit the number of light sources considered in the current 3D scene.
- Make the 3D view window size as small as possible for comfortable work. This is effective on computers with a limited amount of video memory.
- While you are working on the project, choose the View > 3D View > Rendering Quality > Without Lights & Shadows mode in the main menu.
Note that you can edit your project at lower quality and then set up high quality to export pictures or videos.
While you are editing your project, keep in mind the following:
- Turn off the light sources located outside the room you are working on, and those which aren't critical for the current 3D scene. You can control the light sources in the Light Properties tab of the Inspector.
- Objects shouldn't plunge into the floor, ceiling or walls. To be sure that an object is placed properly, activate the Glue By (appropriate object side) option, and move the object around to let it snap to the floor, ceiling or other nearby surface. Be careful when you change the object's elevation manually.
- Draw the walls carefully. Red circles on the floor plan indicate the places where walls join not neatly. Fix all such issues.
- Avoid opening more than one project at the same time. Projects opened in the background can consume computer resources that could be used for the project you are working on.
- Don't use too many reflective materials. The program performance can decline if you apply reflective materials to a large number of small objects.
- Avoid creating many variations of the same object using the Type and Representation dialog (3D properties) or by editing objects in the SketchUp application. The more different objects are present in the project, the longer the rendering takes. The program works faster with a number of copies of the same object rather than with the same number of different objects (of the same complexity). The program uses one pattern object for all its copies in the project. An object, even slightly modified, can be treated as a completely different one.
- Hide those objects that aren't critical for your current work, or those which are invisible from the current point of view. You can use the Project Tree to make objects visible and invisible. For example, if you have several trees outside, hide them while you are editing the interior of the rooms.
- Deactivate the Cast Shadows option in the Inspector when possible. Shadows may not be visible when a flat object is attached to a bigger one (wall picture or area rug), an object is very small (pen on a table), one object is inside of another (books on a bookshelf, or a TV set in a niche), and in other cases.
Avoid using too detailed 3D models. The Type and Representation dialog lets you decrease the object's level of detail.
Since all programs running at the same time may share the computer resources, make sure that you have closed programs you don't use. A more radical measure is to reboot your computer and start only Live Home 3D and as few programs as possible. This will let Live Home 3D use maximum available computer resources.
Red Circles on the Floor Plan
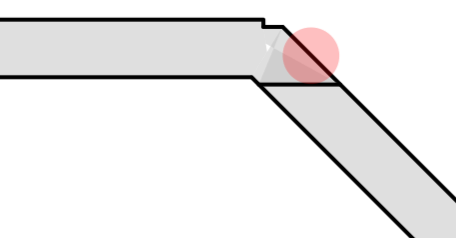
Red circles indicate that walls didn't connect to each other properly in the point where a corner should appear. As a rule, errors of this type are caused by small pieces of wall added unintentionally. Sometimes this can happen when a wall adjoins another wall at a very sharp angle.

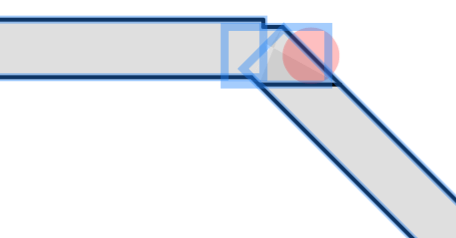
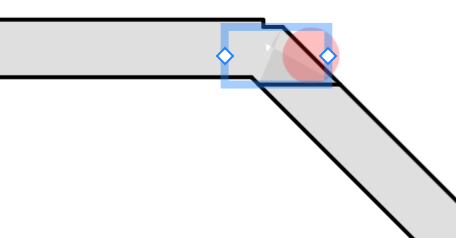
To fix such an error, you should find out how many walls are present near the red circle. The problem may be caused by a very small wall that overlays another wall and hence is not visible very well. Select all walls around the red circle using the selection frame. This will highlight contours of the walls and may make an invisible wall visible. In the image below, a small wall, added by mistake, appears to be present over the corner.

An alternative way is to select walls one after another in the Project Tree and see if the currently selected wall is located near the red circle.

All unintended walls, as one selected in the image above, should be deleted. If the circle remains, then you need to check the rest of the walls near the red circle. Select one and delete it. If the red circle is still there, call Undo and do the same with another wall until the problem is fixed.
Printing Problems
The printer does not print:
- Check the cable connection between the printer and the computer.
- Make sure the printer is turned on.
- If several printers are installed in your system, make sure the correct printer is selected in the program.
- Check the paper source selected for the printer: some printers have several input trays.
- Make sure that paper is properly loaded into the printer.
If your printed text or images have low quality (light stripes or gaps on the printout, or the printout fades out, or you see wrong colors), check the ink or toner level.
If the printout is blurry, or ink dries out for a long time:
- Make sure the paper meets the printer specification requirements.
- Check if the correct side of the paper is used.
- Check if the proper paper type is selected in the printer settings.
To understand the cause of the problem, make a test printout from other software. If the problem persists, it's more likely that the problem is related to the hardware.
For more detailed guidance, refer to your printer User's Manual.
Other Problems
If you cannot find a solution to your problem above, contact the BeLight Software support.