Working with Projects
The Project Tree
The Project Tree is a list of objects that have been added to the current project. It is located in the rightmost tab of the Library panel.
To open the Project Tree, tap on the Library button ![]() in the toolbar. Then choose the Project Tree tab
in the toolbar. Then choose the Project Tree tab ![]() .
.

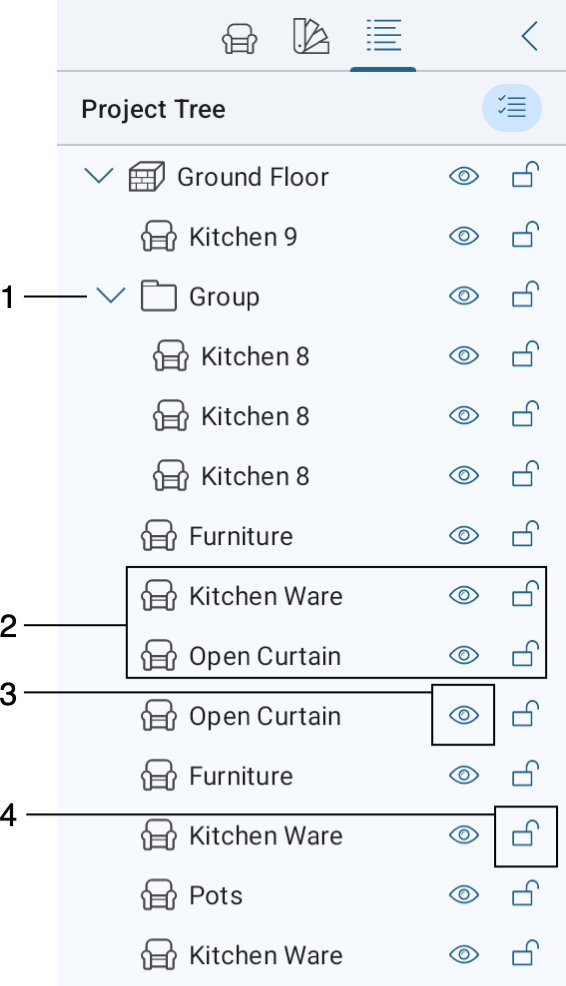
1 – An object. By tapping on the object's name in the list, you can select the object in the list and in the project.
2 – Sub-items of an object or group. Tap on the ">" icon to show or hide the sub-items.
3 – The Visibility option. Tap on the icon to hide or show an object in the project.
4 – The Lock option. Tap on the icon to prevent occasional modification or moving of an object. You will not be able to select a locked object in any of the views.
The objects are grouped in the list by type. For instance, walls are listed together and are not mixed with objects of other types. If you need to select all objects of the same type, it is easier to do this in the Project Tree.
In order to select several objects, tap on the ![]() button to activate the multiselection mode. Then tap on objects that you want to select.
button to activate the multiselection mode. Then tap on objects that you want to select.
Some objects may have parts that are displayed in the Project Tree as sub-objects. For example, a door object has a door frame and a door itself. Their parameters may be changed separately. A wall object can have crowns and bases on both sides.
When you select an object in any view, it becomes selected in the Project Tree, and vice versa.
If you have difficulties in finding an object on the floor plan, select it in the Project Tree. The object's selection frame will let you distinguish it from other objects in the 2D or 3D view. Make sure that you are looking for the object on the right floor.
Some objects, especially those you have imported, can have a yellow warning sign in the Project Tree. This sign indicates that the object was created with many details, which can potentially decrease the rendering speed of the 3D view. For more detail, read the Type and Representation section.